Choice Eliminator for Google Forms™ | Choice Limiter
Quick Start Guide: Set Up & Share Your Form Limits
Prepare class signups, parent-teacher appointments, or activity choices. Set the number of places, save your limits, and share the correct link with students or families.
Before sharing your signup sheet, activity selection, or appointment form with students, parents, or team members, verify these essential steps:
Check Google Form settings: Make sure your Google Form is published, accepting responses, and accessible to respondents. Read the form setup instructions ↗ before setting choice limits.
Set your choice limits: Open the Choice Eliminator sidebar (Extensions > Choice Eliminator for Google Forms > Configure) and enter a capacity limit for each choice. Empty or 0 keeps that option unlimited.
Save and preview: Click Save in the sidebar, then use the preview button (eye icon) to confirm choices disable or hide when full in the respondent view.
Share the add-on link or QR code: Copy the official responder link from the top of the sidebar or use the built-in QR code. Your sharing link must always start with:
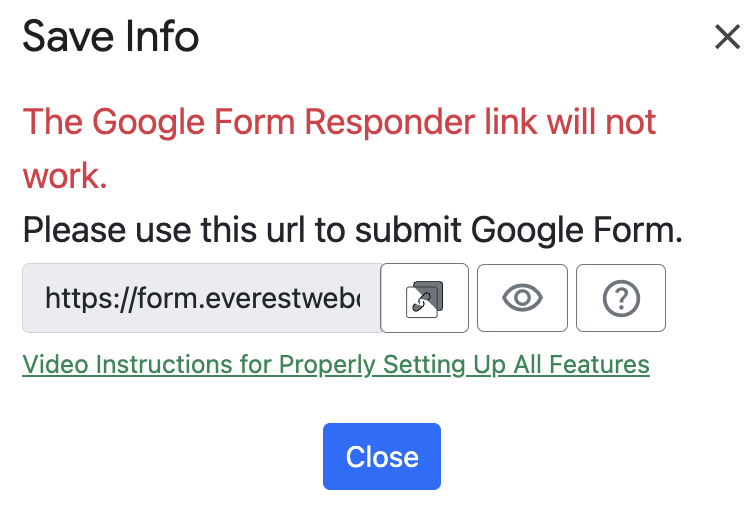
Important: The original docs.google.com/forms link bypasses your choice limits entirely. Only the form.everestwebdeals.co responder link enforces availability before respondents submit.
Most important: share the add-on link
After you click Save, copy the responder link shown at the top of the sidebar.
This link starts with:
https://form.everestwebdeals.co/?form=...
This is the only link respondents should use. It loads your Google Form through the secure
form.everestwebdeals.co domain so Choice Eliminator can apply limits before
users submit.
Do not share the original docs.google.com/forms responder link. If respondents use the original Google link, Choice Eliminator cannot hide or disable full choices, cannot validate limits before submit, and the form may receive over-limit selections.
Where to get the correct Choice Eliminator link
To get the correct Choice Eliminator responder link, open the add-on sidebar in Google Forms via Extensions > Choice Eliminator for Google Forms > Configure, set your limits, click Save, and copy the dedicated URL starting with https://form.everestwebdeals.co/.
Open Extensions > Choice Eliminator for Google Forms > Configure.
Set your choice limits and click Save.
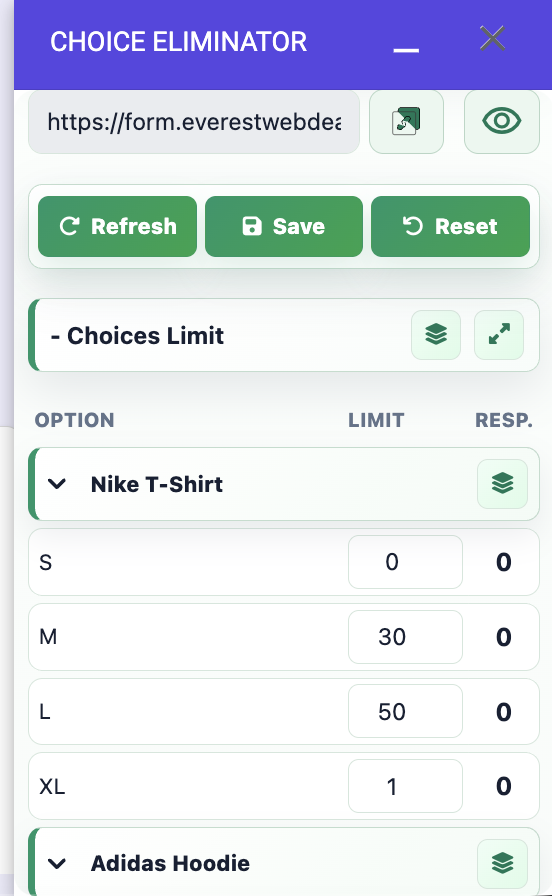
Use the link field at the top of the sidebar. It should start with https://form.everestwebdeals.co/.
Click the copy button beside that field to copy the add-on responder link.
Click the preview button to test the same link before sending it to respondents.
Use the copy button beside the responder URL field. The eye button opens a preview of the same add-on link.
The built-in QR Code block automatically uses the permanent add-on responder link. Use that QR code when sharing the form.
Why the original Google link will not work
Choice Eliminator extends the Google Forms respondent page with its own validation layer.
The add-on link wraps the original Google Form, loads it on the secure Everest Web Deals
domain, applies your saved limits, checks selected choices before submit, updates response
counts, and then sends the response to Google Forms.
The original Google Forms link opens Google Forms directly. That direct page does not run the
Choice Eliminator wrapper, so it cannot enforce Choice Eliminator rules.
Check form settings: Ensure your Google Form is published and accepting responses.
Open the sidebar: Go to Extensions > Choice Eliminator for Google Forms > Configure.
Set choice limits: Enter limits beside the choices you want to control. Empty or 0 means unlimited.
Choose limit action: Select Disable and strikethrough or Hide when capacity is reached.
Save and preview: Click Save, then click the preview (eye) button to test the respondent view.
Share the add-on link: Copy and share only the form.everestwebdeals.co link or QR code from the sidebar.
If users say the add-on is not working
First check which URL they used. Most issues happen because the original Google Forms URL was
shared instead of the add-on responder URL.
Open the sidebar and copy the form.everestwebdeals.co link again.
Replace old links in emails, websites, calendars, documents, and QR codes.
Ask respondents to submit through the new add-on link.
Use Preview from the sidebar to confirm full choices are hidden or disabled.
Supported choice questions
Choice Eliminator reads the choice-based questions in your form and shows them in the
Choices Limit table. Other question types stay in the form, but they do not need
choice limits.
Limit column
Enter the maximum number of times each choice can be selected. Empty or 0
means the choice is unlimited.
Resp. column
Shows the current number of submitted responses for that choice. Click Refresh
when you want to reload the latest counts from Google Forms.
Restore a full choice
If a choice is full, increase its limit above the response count and click Save.
The add-on responder page will make that choice available again.
Grid questions
For grid and checkbox grid questions, limits are saved by row and column so each grid option
can have its own availability.
Choices Limit table with Limit and Resp. columns
Faster limit editing
Apply limit to all choices
Use the layer button in the Choices Limit header to write the same limit into all available
choice boxes at once.
Apply limit to one question or grid row
Use the small group limit control beside a question or row header to update that group without
editing each option one by one.
Full screen configuration
Use the full-screen button when the form has many questions or long option text. It opens a
larger configuration view for easier editing.
Save, refresh, and reset
Save
Saves limits and settings to the Choice Eliminator service. Respondents see the new rules only
after the settings are saved.
Refresh
Reloads questions, options, and response counts in the sidebar. Use it after editing the Google
Form or after changing responses in Response Manager.
Reset
Deletes all Google Form responses and clears the response counts. Link the form to a spreadsheet
first if you need a backup of old responses.
Reset removes responses from the Google Form. Spreadsheet rows that were already saved are not removed automatically.
Limit reached behavior
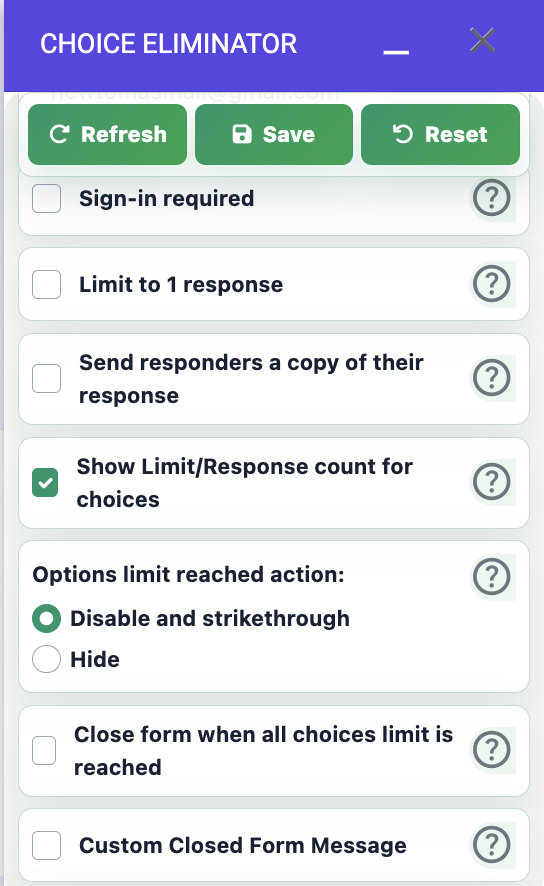
Disable and strikethrough
Full choices stay visible in the add-on responder page, but users cannot select them.
Hide
Full choices are removed from the add-on responder page so users only see available choices.
Show Limit/Response count for choices
Shows each choice limit and response count to respondents in the add-on responder page.
Close form when all choices limit is reached
Closes the Google Form when every choice in the limited questions has a positive limit and
has reached it. If any choice is unlimited, the form stays open.
Custom Closed Form Message
Replaces the default Google closed-form message with your own message after the form is closed.
Respondent view: disabled choices and hidden choices
Share and test the respondent experience
Copy responder link
Copies the add-on responder link from the top of the sidebar. This is the link to use in
emails, websites, calendars, documents, and QR codes.
Preview responder link
Opens the same add-on link so you can test what respondents will see before sharing it.
Share the form via QR Code
Generates a permanent QR code for the add-on responder link. You can set size, colors, error
correction, add a logo, then download, copy, or print it.
When you replace links, also replace old QR codes. A QR code made from the original Google Forms URL bypasses Choice Eliminator.
Access controls
Sign-in required
Requires respondents to sign in with a Google account before submitting through the add-on link.
Limit to 1 response
Helps prevent the same email address from submitting more than once. Use the duplicate email
validation message to explain what happened.
Allow external sharing with only trusted domains
Restricts submissions to the domains you list, such as company.com or
school.edu. Separate multiple domains with commas.
Send responders a copy of their response
Sends respondents an email copy of their submitted answers from the add-on flow.
Validation messages
Customize the messages respondents see when the add-on blocks a submission. Keep the placeholders
in the message if you want the add-on to insert live values.
Concurrent submission message
Appears when two respondents try to submit at almost the same time and the add-on is protecting
the response count.
Email already submitted message
Used with Limit to 1 response. Keep %emailAddress% so the blocked
email address can be shown.
Limit reached message
Appears when a selected choice became full before the response was submitted. Keep
%choices% so the add-on can list the full choices.
Notifications
Enable Notify me when choice limit is reached to receive an email when a choice
reaches its saved limit. Add one or more owner email addresses separated by commas.
Notifications are useful for workshops, appointment slots, inventory, or any signup where the owner should know when an option becomes full.
Response Manager
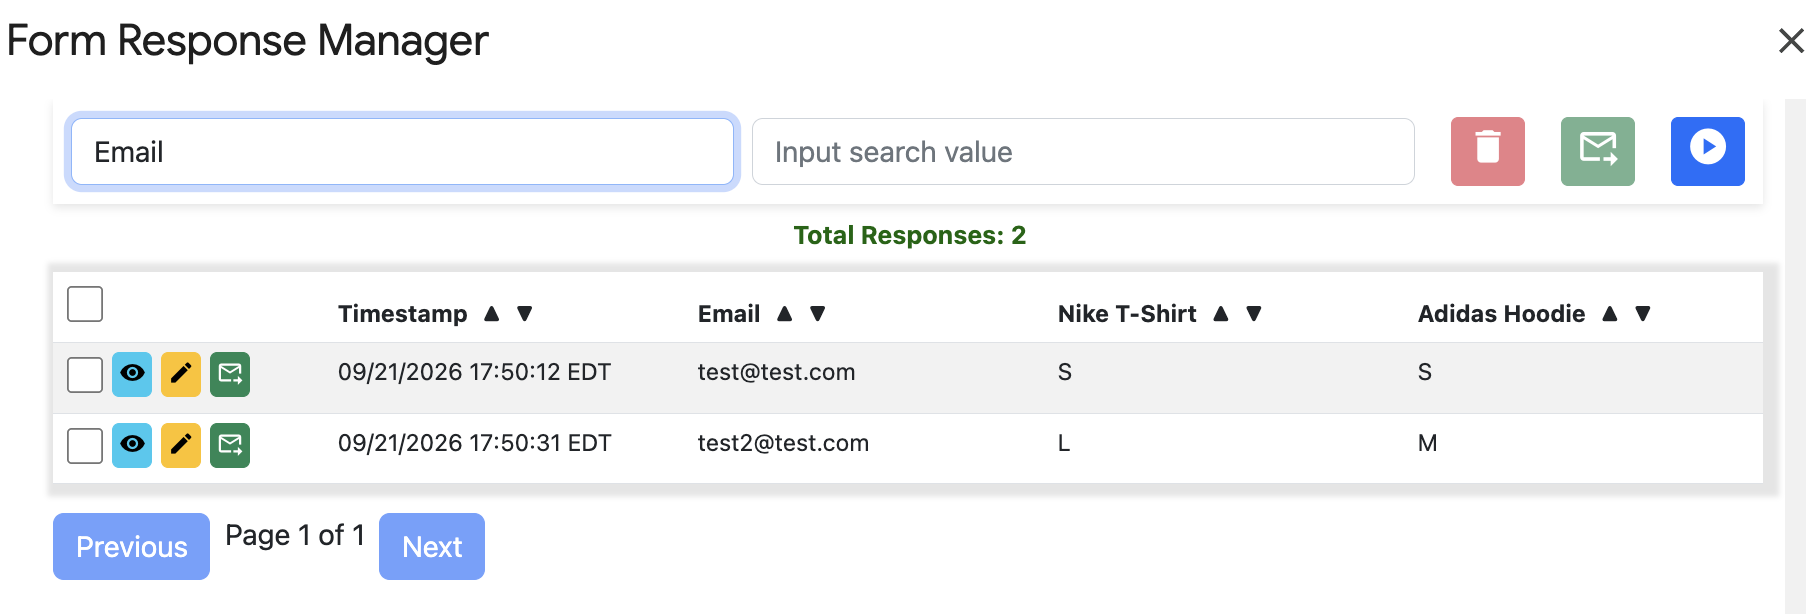
Open Extensions > Choice Eliminator for Google Forms > Response Manager to
review submitted responses and handle changes.
If a respondent cancels, delete the response in Response Manager. Response and limit counts update automatically.
If an admin cleans or edits a response, refresh the sidebar to see the updated counts.
If a respondent needs to change their answer, use response editing when appropriate and share the edit link.
Response Manager with submitted responses
Schedule reset form
Use scheduled reset for repeating forms, such as daily appointments, weekly events, class seats,
equipment checkout, or recurring inventory. You can reset every few hours, every day, every week,
every month, or at a selected date and time.
Scheduled reset deletes Google Form responses. The sidebar checks whether the form is linked to a spreadsheet before scheduled reset is enabled.
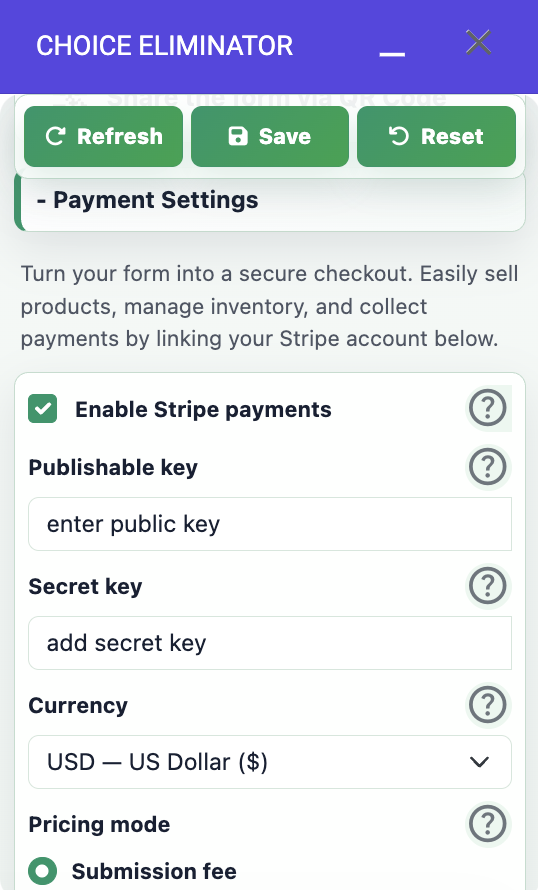
Stripe payments
Use Payment Settings when respondents should pay through Stripe while submitting
the add-on responder form.
Enable Stripe payments
Add your Stripe publishable key and secret key, then choose the currency for checkout.
Submission fee
Charges one flat amount for each form submission, no matter which choices the respondent selects.
Option based pricing
Adds prices to supported choice options. The payment amount is calculated from the selected options.
Submission fee disclaimer
Shows a short message above the Pay with Stripe button so respondents understand what they are paying for.
While Stripe payments are enabled, response editing by respondents is disabled to prevent paid edit links from being reused.
Payment Settings and option based pricing
Warnings to fix before sharing
Form is not published
Publish the Google Form before sharing the add-on responder link.
Responder link is private
Make sure the form can be opened by the audience you plan to invite. If needed, change sharing
to anyone with the link.
Google Forms settings warnings
Follow sidebar warnings when native Google Forms settings conflict with Choice Eliminator
settings. The add-on link should control response copies, one-response rules, and validation.
Click Refresh after editing form questions or responses.
Replace old Google Forms links in emails, websites, calendar invites, documents, and QR codes.
Use the eye button to preview the exact add-on responder link respondents will use.
Check sidebar warnings for publishing, sharing, license, or Google settings issues.
If the original Google Forms responder URL is still available somewhere, respondents can bypass Choice Eliminator from that old link.
Choosing the right setup guide
Choice Eliminator for Google Forms™, Choice Limiter setup: use this guide to control availability for each choice and share your form.
Does this guide cover Choice Eliminator Lite, Choice Eliminator 2, or Choice Eliminator 3?
This guide covers Everest Web Deals’ Choice Eliminator for Google Forms. If you searched for
Choice Eliminator Lite, Choice Eliminator 2, or Choice Eliminator 3, check the name and developer
of your installed add-on before following these steps. These instructions apply to the sidebar
that provides a form.everestwebdeals.co responder link.
I searched for “form choice limiter, limit, choice eliminator”. Where should I start?
Start with Correct setup flow to set a limit for each option.
Save your settings, then share the add-on responder link so the limits apply to submissions.
I searched for “limit it: form limiter, choice eliminator, qr code”. How do I share this form?
For the Everest Web Deals add-on covered here, use the sidebar’s built-in QR Code block or copy
its responder link. See Where to get the correct link and Share and test the respondent experience.
If you installed another add-on, use that developer’s setup guide.
What is the difference between Choice Eliminator, Form Field Limit, and Form Response Limit?
Use Choice Eliminator (and Form Choice Limiter) when you need to set limits on individual choices, options, or grid rows within a question. Use Form Response Limit when you need a total submission cap or scheduled closing time for the entire form, and Form Field Limit when controlling character counts or input lengths.